How importing works
An import is a snapshot of one CSV file: the account's transactions as your broker exported them. SmartStrikes reads every trade in it and builds the same analysis it builds for a live account, so imported positions get their own tranches, break-evens and P&L.
Each imported account is analyzed on its own: trades are never pooled across accounts, even for the same stock. Because it's a snapshot, new trades appear only when you update the import with a newer file.
Fidelity and Tastytrade exports are supported.
Step 1: Download your Fidelity history
- Log in at fidelity.com and go to Accounts & Trade → Account Positions.
- In the accounts list on the left, select the specific account you want, not All accounts. On a phone you may need to open the pane on the left first to see your individual accounts.
- Once that account is showing in the main part of the screen, open its Activity & Orders tab.
- The time period button is usually set to Past 30 days. Most people want every trade this year: tap it, choose Year to date, then tap Apply at the bottom of the list. On a phone you may need to scroll down to see Apply.
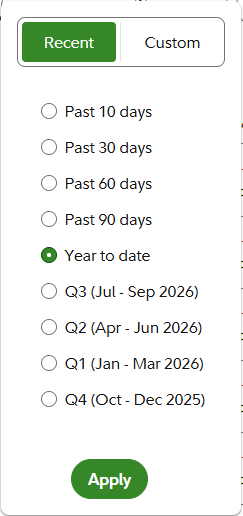
a Year to date, then b Apply. - Wait a moment for the activity to load. Then click the download icon (a down arrow with a line under it) near the upper right of the tab's area, and choose Download as CSV.
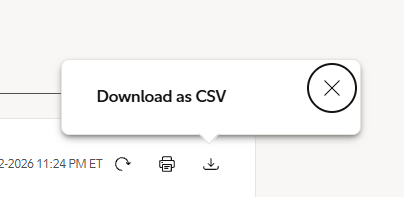
After the download icon, choose Download as CSV.
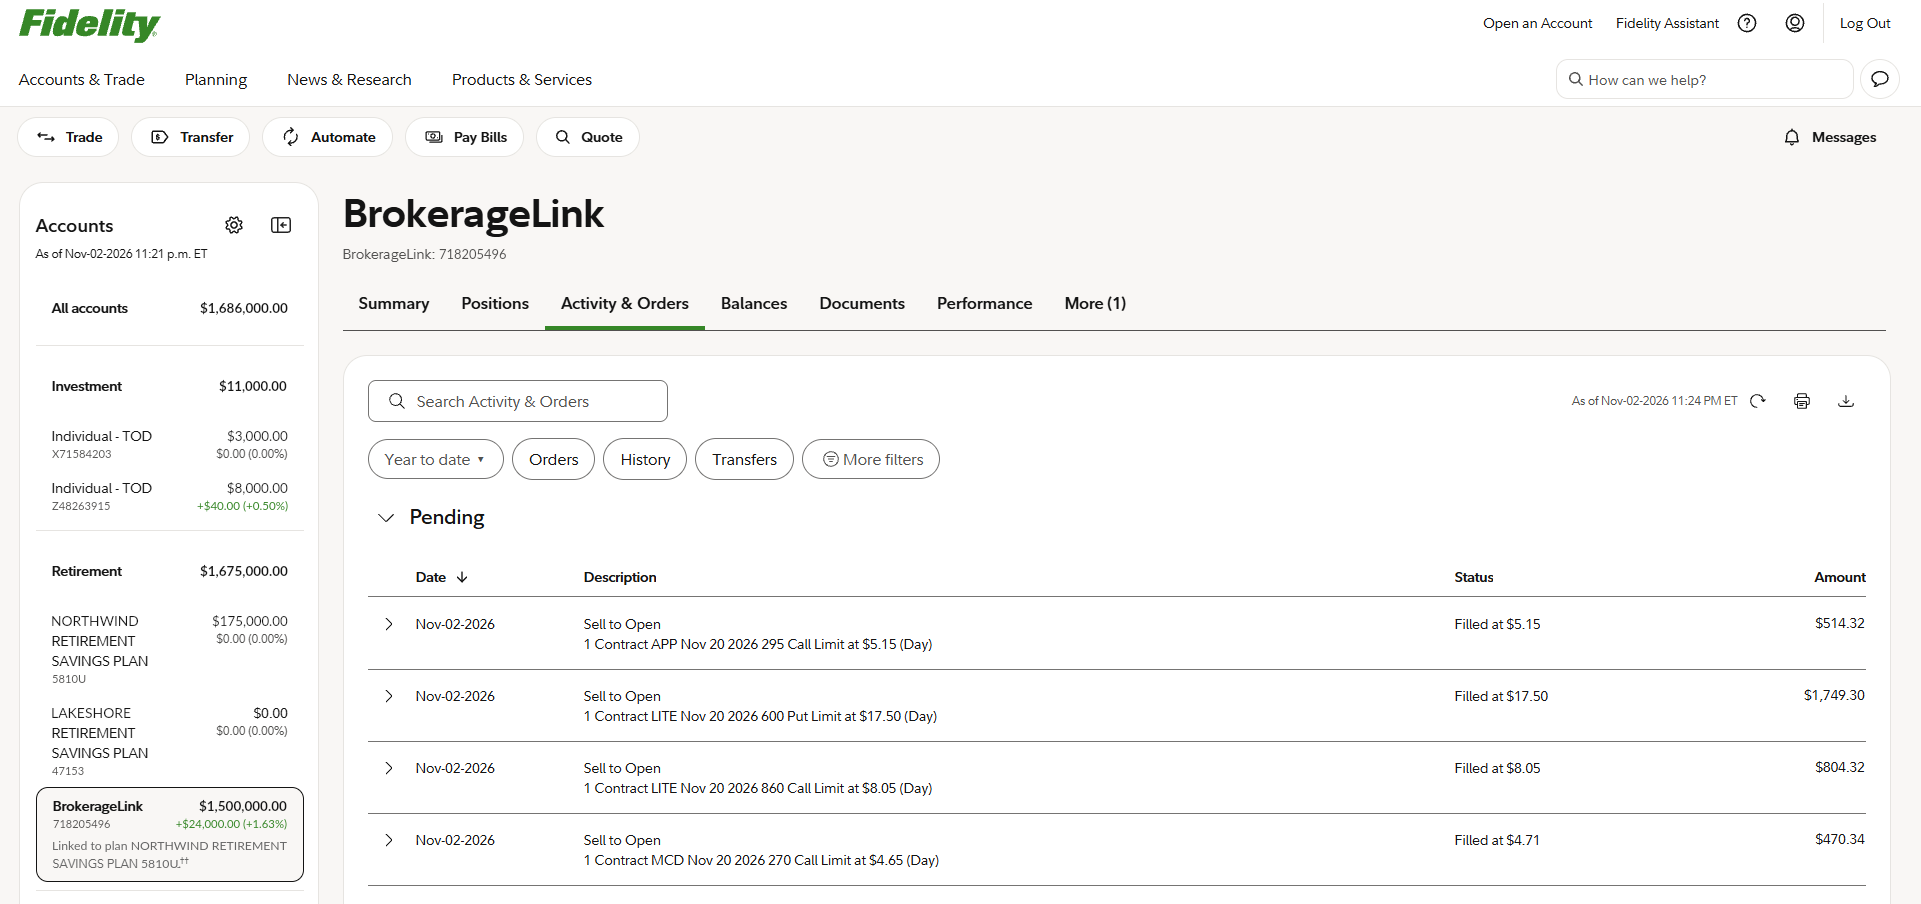
Your browser saves a file named like History_for_Account_000000000.csv, with your account number in place of the zeros, usually in your Downloads folder. The first time, the name has no number in brackets. After that, while the earlier files are still in your downloads folder, each new download of the same account adds a number that counts up: (1), then (2), and so on, such as History_for_Account_000000000 (1).csv.
Leave the file names as they are. SmartStrikes reads the account number from the name, and when you update an import, uses it to tell you which file to pick next.
Step 2: Import it into SmartStrikes
- In SmartStrikes, tap the ⚙ gear at the top right to open Settings, and choose Analysis.
- Tap Import Account.
- In the sheet that opens, tap the folder icon and pick the file you just downloaded, usually in your Downloads folder.
- Check the Broker. SmartStrikes recognises it from the file and fills it in, Fidelity for a Fidelity download, with Detected from the file under it. You can still change it.
- Check the Account name. It's filled in with the account number from the file's name; change it if you'd rather call the account something else, such as Fidelity IRA.
- Tap Import.
The account now has its own section in Settings → Analysis, where the next two steps happen, and appears in the Analysis tab's views.
If you renamed the file
SmartStrikes still recognises the broker from the file's column headings. But the account number is only in the original name, so the Account name is left empty for you to fill in, and Update Import can't tell you which file to pick next. Keeping the download's name avoids both. If a file isn't recognised at all, the Broker is left empty for you to choose.
If the file is refused, the message says why: "Please select a CSV file." means it isn't a .csv file, "This doesn't look like a Fidelity transaction history" means it's some other kind of CSV (or the wrong broker is chosen), and "That file is not valid UTF-8 text." means it should be downloaded again.
Step 3: Enter the account's value
SmartStrikes can't read an imported account's balance, so the account's section in Settings → Analysis has a Net Liquidating Value for you to fill in: the account's total value, as Fidelity shows it.
Views that measure positions against the size of the account use it, such as exposure as Capital % of the account, and the CAGR figures.
It doesn't update by itself. When the account's value changes enough that you want figures like Capital % to stay accurate, enter the new value.
Optional: Add earlier history
Break-evens and P&L can only see the trades SmartStrikes has. If your positions started before this year, add the earlier trades as Pre-import transactions: a second file, kept with the account, covering the time before the main Imported CSV.
The usual way: use last year's full history as the pre-import and this year's (year to date) as the main import. Together they give SmartStrikes an unbroken record from the start of last year to today. From then on you only ever update the main import; once the pre-import is set, you typically never touch it again.
The pre-import can start at any point before the main file, but it has to fit against it exactly:
- No gap: it must include every transaction from where it starts up to where the main Imported CSV begins.
- No overlap: it must not repeat any transaction that's also in the main file.
To add it, open the account's section in Settings → Analysis, tap Add file under Pre-import transactions, pick the file, and tap Set Pre-Import. Replace swaps the file later, and Clear removes it.
Downloading last year's history from Fidelity
Follow the same steps, except for the time period:
- Tap the time period button and switch to the Custom tab.
- Enter last year's first and last days as the From date and To date, for example 01/01/2025 and 12/31/2025. Fidelity allows any period of up to 365 days, going back 5 years.
- Tap Apply, wait for it to load, then download it as a CSV as before.
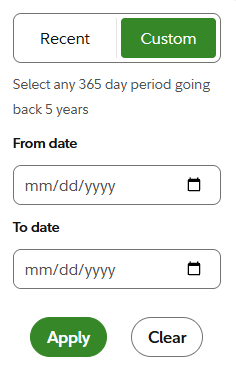
The year-to-date file you import as the main CSV then starts on January 1, right where this one ends, so there's no gap and no overlap.
Keeping it up to date
Whenever you've made new trades and want SmartStrikes to show them:
- Download a new CSV from Fidelity, following the same steps.
- In Settings → Analysis, tap the account's Update Import, and pick the new file.
A shortcut: in the Tranches and Contracts views of the Analysis tab, each imported account's title row has a small upload icon beside its name. Tap it to go straight to Update Import.
Update Import keeps the account and broker as they are, and tells you which file to pick: the next numbered copy of the file you imported last. After History_for_Account_000000000 (20).csv, for example, it tells you to look for History_for_Account_000000000 (21).csv. The views refresh and a message confirms the update.
A browser never tells a web page where a file is, so you pick the file each time. For the same reason, Refresh in the Analysis views can't re-read an imported file; for an imported account it reminds you to use Update Import.
Fidelity and Tastytrade differences
Fidelity's history gives dates without times. That matters in one place: when you roll a put, SmartStrikes matches the buy-back and the new sale by trade date. If several puts on a stock were bought back and sold the same day, it pairs the closest matches and marks the pairing as a best guess. Rolls and break-even explains what a roll changes.
Tastytrade records exact times, so a roll there is matched when the buy-back and the new sale are within an hour of each other. A Tastytrade account connected on Pro is fetched live and doesn't need importing; import a Tastytrade CSV for another Tastytrade account, or as a pre-import for history older than the live account's fetch range (Settings → Analysis → Transaction range to fetch).
Removing an import, and where imports are kept
To remove an import, tap Remove import (the bin icon) on its section in the Ledger, or the bin icon at the right end of the account's title row in the Tranches view. SmartStrikes asks first.
The contents of each imported file are stored in your browser, encrypted with your other SmartStrikes data and unlocked by your PIN. That's why SmartStrikes can rebuild an imported account's analysis without asking for the file again.
Imports aren't synced, so keep your CSV files. Each browser and device has its own imports, so import in each place you use. Once an import is removed, the only way back is to import the file again. Browsers can also delete site data, for example when the disk is nearly full or when you clear browsing data. SmartStrikes asks the browser to keep its storage, but keep your files in case you need them again.
Still stuck? In the app, tap ? to ask SmartAssist, or contact support.